

Let’s be real—we’ve all been there, scrolling through Pinterest at midnight, stomach growling, wondering if we can whip up something amazing without actually turning on the oven.
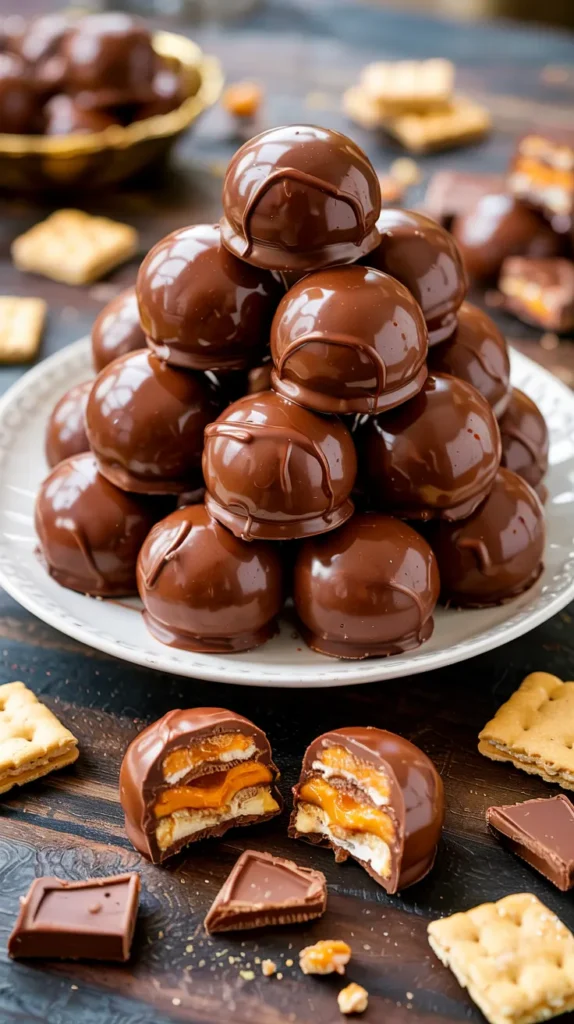
Enter these Butterfinger Balls: little spheres of peanut buttery, chocolatey heaven that require zero baking skills but will have everyone thinking you’re some kind of dessert wizard.
They’re basically what would happen if a peanut butter cup and a Butterfinger had a baby and then rolled it in chocolate. Intrigued? You should be.
Why This Recipe is Awesome
First off, these little gems are ridiculously easy to make. If you can stir things and roll dough into balls, congratulations—you’ve mastered the hardest parts of this recipe.
Plus, they’re a no-bake situation, which means no waiting for the oven to preheat and no chance of burning anything. Win-win.
The combination of creamy peanut butter, crunchy graham crackers, and those irresistible bits of Butterfinger creates this perfect texture contrast that’ll make your taste buds do a happy dance. And when you coat the whole thing in smooth, glossy chocolate?
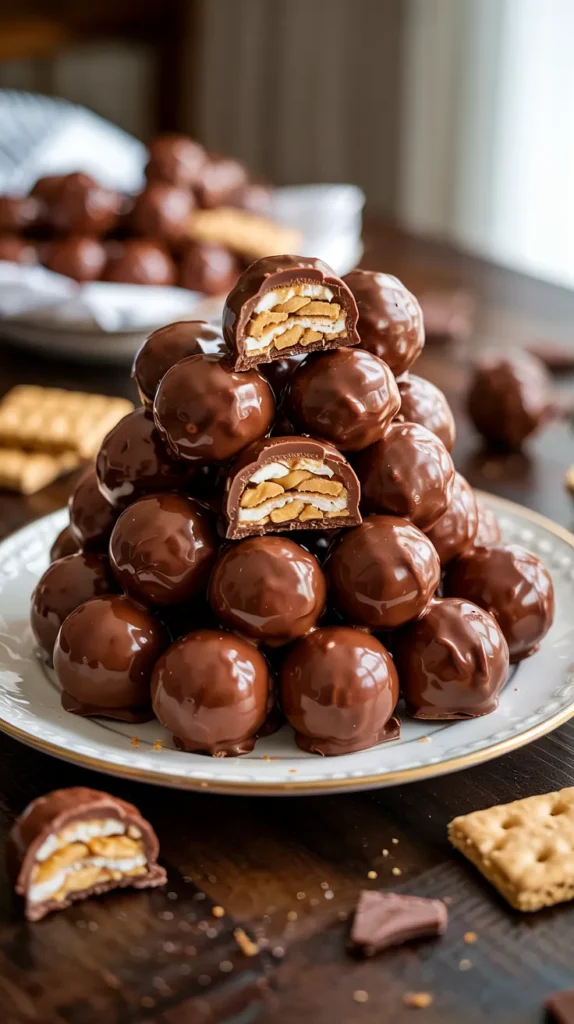
Game over. These aren’t your average peanut butter balls—they’re like the luxury sports car version of peanut butter balls.
Oh, and did I mention they’re perfect for impressing people with minimal effort? Make these for your next party and watch how quickly they disappear.
Just be prepared for everyone to ask for the recipe while giving you that “I didn’t know you could bake” look. (Don’t worry, your secret’s safe with me.)
Ingredients You’ll Need
- 4 tablespoons softened butter (that’s half a stick, for the math-challenged)
- 1 teaspoon vanilla extract (the real stuff, not that imitation nonsense)
- 1 cup peanut butter (stick with Jif or Skippy—save your fancy natural PB for your morning toast)
- 1 cup powdered sugar (aka confectioners’ sugar, the stuff that looks like snow)
- ¾ cup graham cracker crumbs (about 6 full sheets, pulverized to dust)
- ½ cup crushed Butterfinger bars (roughly 4 fun-size bars, smashed to smithereens)
- 8 ounces chocolate bark or chocolate chips (for that glossy outer shell)
- Optional garnishes: more crushed Butterfinger, festive sprinkles, or a pinch of sea salt (because we’re fancy like that)
Step-by-Step Instructions
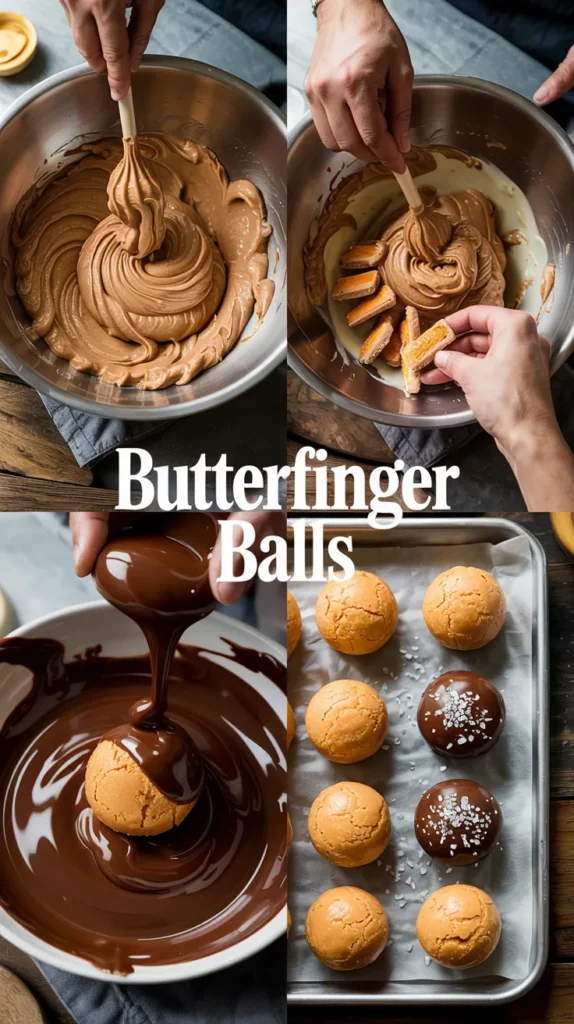
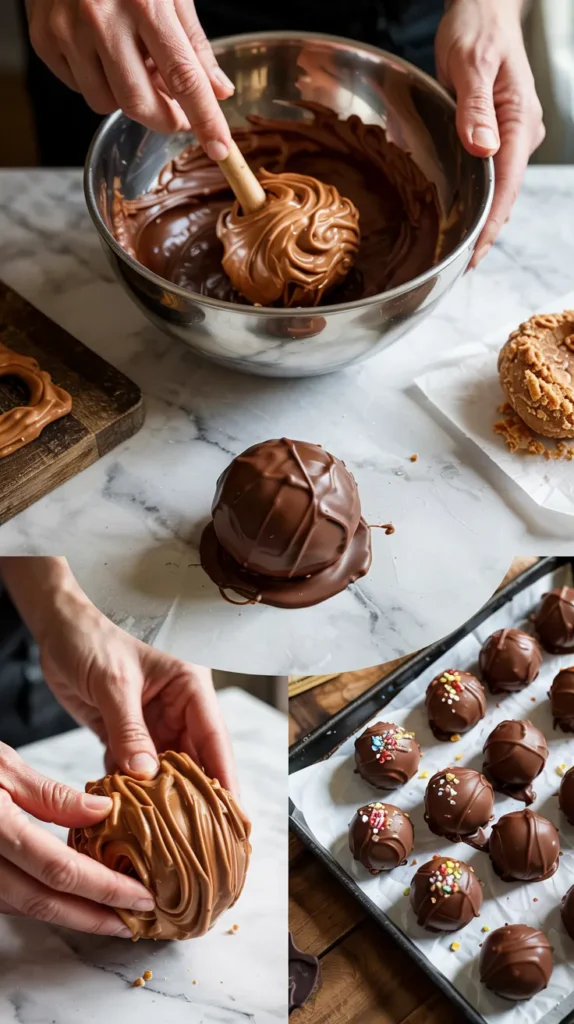
- Grab a mixing bowl and combine the peanut butter and softened butter. Beat them together with an electric mixer until smooth and creamy. This is your base, so make it count.
- Add the vanilla extract and mix until it’s fully incorporated. Take a moment to appreciate the heavenly aroma—that’s the smell of good decisions.
- Gradually add the powdered sugar, mixing on low speed. Unless you enjoy wearing a sugar cloud, in which case, crank that mixer to high and go wild. (Don’t actually do this.) Scrape down the sides of the bowl occasionally to make sure everything’s playing nice together.
- Here comes the fun part—fold in those graham cracker crumbs and crushed Butterfinger pieces. This is what gives these balls their signature texture and flavor. Do this gently with a spatula, not the mixer, unless you want Butterfinger dust everywhere.
- Line a cookie sheet with parchment paper. Using a tablespoon measure or a small cookie scoop, portion out the dough and roll it into neat little balls. Your hands might get a bit messy, but that’s what taste-testing is for, right?
- Pop the tray of balls into the freezer for about 30 minutes until they’re firm. This step is crucial—trying to dip soft balls in chocolate is like trying to bathe a cat. Technically possible, but why make life harder?
- When the balls are properly chilled, melt your chocolate. You’ve got options here: microwave in 30-second bursts at 50% power (stirring in between) or use a double boiler if you’re feeling fancy. The key is to not overheat the chocolate—some lumps should remain and will melt as you stir.
- Dip each chilled ball into the melted chocolate, making sure to coat it completely or leave a tiny bit exposed on top for that “look what’s inside” teaser. Use a fork to fish them out, letting excess chocolate drip off.
- Before the chocolate sets, sprinkle with your choice of toppings—more crushed Butterfinger, festive sprinkles, or a pinch of flaky sea salt for that sweet-savory contrast that makes people go “Mmm, what IS that?”
- Let the chocolate harden completely. You can speed this up by popping them back in the fridge for about 15 minutes, or just practice patience (overrated, I know).
Common Mistakes to Avoid
- Using natural peanut butter – Save your organic, oil-on-top peanut butter for your health-conscious moments. These balls need the stability of commercial brands like Jif or Skippy.
- Not chilling the balls long enough – Rushing this step will result in a chocolate-dipping nightmare. Trust me, those extra minutes in the freezer are worth it.
- Overheating the chocolate – Chocolate is like that high-maintenance friend who needs everything just so. Heat it gently and slowly, or it’ll seize up and turn into a grainy mess.
- Making them too big – While the temptation to create giant Butterfinger bombs is real, keeping them bite-sized means better chocolate-to-filling ratio and easier eating. Plus, people feel less guilty eating three small ones than one massive one.
- Thinking you’ll only eat one while making them – Let’s be honest, some of that mixture is never making it to the ball-forming stage. Plan accordingly.
Alternatives & Substitutions
Not a Butterfinger fan? (First of all, who are you?) Try using Heath bars, Snickers, or even Reese’s Pieces instead. Each will give these balls their own unique personality.
Want to get a little crazy? Swap the graham crackers for crushed pretzels to add a salty kick to the mix.
For a more grown-up version, add a tablespoon of bourbon to the mixture and a sprinkle of flaky sea salt on top. Don’t worry, the alcohol cooks off… Wait, there’s no cooking. Never mind, you’re just making boozy candy balls. Enjoy responsibly!
No powdered sugar? In a pinch, you can blitz granulated sugar in a food processor to make your own. It won’t be quite as fine, but it’ll work.
FYI, if you’re looking to impress the gluten-free crowd, just swap the graham crackers for gluten-free ones. No one will taste the difference, I promise.
FAQ (Frequently Asked Questions)
How long do these last? In theory, they’ll keep in an airtight container in the fridge for 3-4 weeks. In reality, they’ll vanish within 48 hours. It’s just science.
Can I freeze these for later? Absolutely! Layer them between parchment paper in an airtight container and freeze for up to 6 months. Though let’s be real—you’re not going to forget about chocolate-covered peanut butter balls for 6 months.
My chocolate isn’t setting properly. What went wrong? You might have added water (enemy #1 of melted chocolate) or overheated it. Next time, make sure your utensils are completely dry and melt the chocolate more slowly.
Can I make these without a mixer? If you’ve got biceps of steel and the patience of a saint, sure! Otherwise, a hand mixer will save you a lot of arm workout.
The dough is too sticky to roll into balls. Help! Your kitchen is probably too warm or your peanut butter is too oily. Add a bit more graham cracker crumbs, then chill the dough for 15 minutes before rolling.
Is there a way to make these healthier? No. Next question.
Okay, but seriously, can I reduce the sugar? You can try reducing the powdered sugar by up to a quarter cup, but the texture will be softer. And remember, these are called Butterfinger Balls, not Broccoli Balls.
Final Thoughts
There you have it—Butterfinger Balls in all their glory. These little morsels of joy are perfect for holiday platters, game day snacking, bribing coworkers, or just treating yourself after a long day of adulting. They require minimal effort but deliver maximum impact, which is pretty much the gold standard for any recipe in my book.
So go ahead, whip up a batch and bask in the compliments. Just remember to save a few for yourself before they all mysteriously disappear. And if anyone asks for your secret recipe, you can decide whether to share or just smile mysteriously and say, “Family secret.” I won’t tell if you won’t.


